
STA geoprocessing tools
STA geoprocessing tools (“STA TOOLS”) are a collection of toolbox based geoprocessing tools designed to be used in ArcGIS Pro.
The toolbox currently contains:
- Export by area – A tool that takes a STA feature layer and a user generated polygon to select and exports STA data to shapefile.
- Export by date range – Similar to the tool mentioned above, but instead of using a polygon to select data, it uses a date range provided by the user.
- STA data to NVA – The user inputs a STA feature layer, and it exports data to a spreadsheet in a format able to be easily uploaded to the Natural Values Atlas (NVA) used in Tasmania.
- Weed cover calculator – Uses a STA feature layer as an input and a user polygon (like a site boundary), and calculates the area sprayed (%) of the site boundary.
How to use the tools
Last update: 11/02/2026
Getting the tool and adding to ArcGIS Pro
- Download the tool from the link above and save it to a relevant location on your computer.
- Read the “Read Me.txt” file.
- Open an existing, or new ArcGIS Pro project.
- Add the STA logger tools toolbox to the project via the Insert tab (Insert tab > Toolbox > Add Toolbox).
- Open the Geoprocessing pane (Analysis tab > Tools), search for “STA logger” tools in the geoprocessing toolbox and open it.
- (Quick Tip: If you right click on it, you can add it to your favourites or your analysis gallery for that project).
Export by aArea
- Add your STA logger data from ArcGIS Online using the Add Data button.
- Bring in a polygon layer that you want to use as a bounding box to export the data.
- (Quick Tip: If you don’t have an existing feature, and want to create something on-the-fly, you can insert a polygon map note and draw a feature quickly).
- Open the tool, and set the parameters:
- Area of Interest: Your polygon layer that you will use to clip the STA data.
- Input STA layer: Your STA layer (note, it can only accept one layer at a time – point, line or polygon. If you need all three feature types, you must run it 3 times).
- Output location: Where the shapefile(s) will be saved.
Export by date range
- Add your STA logger data from ArcGIS Online using the Add Data button.
- Open the tool, and set the parameters:
- Input STA layer: Your STA layer (note, it can only accept one layer at a time – point, line or polygon. If you need all three feature types, you must run it 3 times).
- Expression: The date range that you want to select to export. Ensure you review the logic parameters (e.g. date “is before” or “is on or before”, etc.).
- Output folder: Where the shapefile(s) will be saved.
STA to NVA
- Add your STA logger data from ArcGIS Online using the Add Data button.
- Open the tool, and set the parameters:
- Input data: The STA point layer.
- Project: The name that will be attributed to the data. This appears in the final export.
- Observers: The users who identified the weeds that you are reporting on. This appears in the final export.
- Output folder: Where the spreadsheet will be saved.
Using weed cover calculator
- Add your STA logger data from ArcGIS Online using the Add Data button.
- Use the time slider to isolate your date range of interest. Data outside of your dates of interest will not be part of the analysis.
- (Quick Tip: You can run the analysis multiple times for different periods of time to get a trend over time)
- Add your site boundary data or draw your Area of Interest polygon. Ensure there are no spaces in the name of the layer.
- (Quick Tip: If you need to quickly draw a rough polygon, add a polygon map note from the Insert tab).
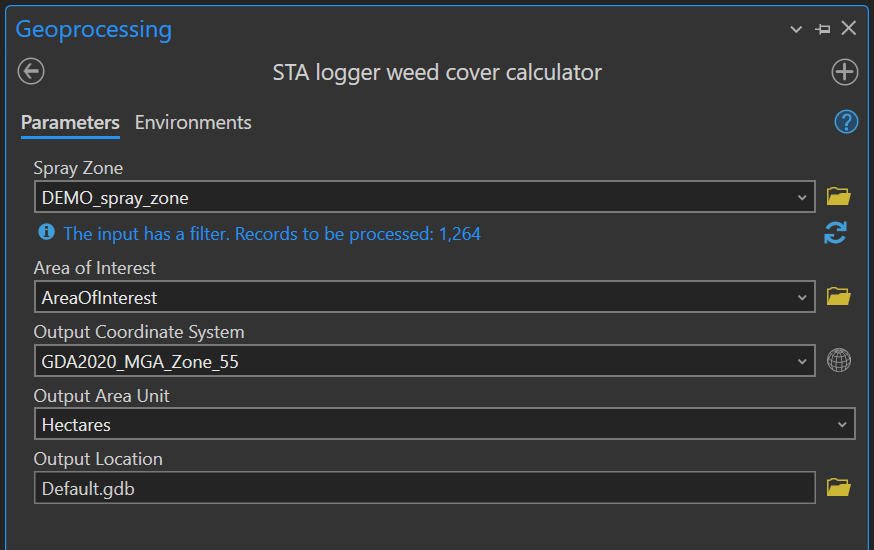
- Set the parameters:
- Spray Zone: Your STA logger spray zone layer.
- Area of Interest: Your polygon layer that defines your area of interest (Before running, remove any spaces in this layer’s title. I.e. ‘Site 442’ becomes ‘Site_442’).
- Output Coordinate System: The projected coordinate system with which area calculations will be based (this should be a projected coordinate system).
- Output Area Unit: The unit of measurement to be used.
- Output Location: The destination where the final feature classes will be saved. By default, this should be a geodatabase location, but if you choose a folder location, the output will be exported as a csv file.
- Run the tool.
Viewing the results
- The results will be added to your map as a table. Right click on the table and select Open.
- You will see four fields:
- Weed cover (%): The percentage of weed cover in your area of interest, calculated as the sum of all spray zones divided by the size of the area of interest.
- Total area sprayed: The sum of the spray zone polygons in your area of interest represented in the units of measure that you selected in the tool.
- Area of interest size: The size of the area of interest represented in the units of measure that you selected in the tool.
- Device count: The number of units with spray zone data in the area of interest.
- Date of analysis: The date that you ran the tool.
- User notes: An empty field for you to add comments to your results.
- The process dissolves overlapping data so as to not overestimate spray area. That means multiple spray events at the same location will be treated as one event if their data overlaps. If you need to avoid this, split the input data into two and run the tool twice.
Recent Posts
STA onboarding
Read More »
So, why the STA logger?
Read More »
Post processing STA Explorer HA data
Read More »
Accurate tree planting mapping – Using the STA explorer HA
Read More »